Epoxy is a wonder solution. Strength, durability, longevity, it does it all. All of that, without sacrificing an ounce of beauty. It's not just about the strength you're getting, either. Any floor that needs to look as good as it performs, lean on resinous coatings.

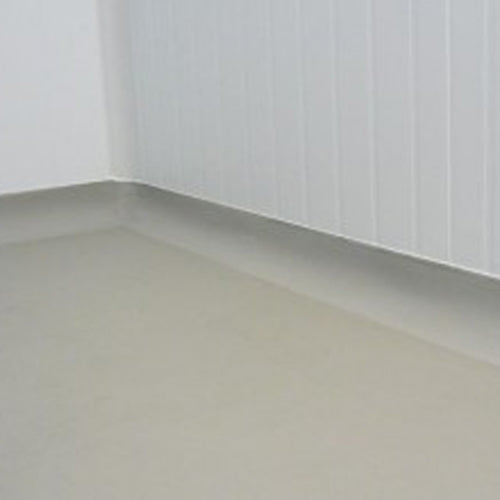
But, to really reach that next level of flooring perfection, you need vinyl cove base solutions. Our DIY resin solutions pair perfectly with our cove base molding solutions to provide you with the full package.

Shop Online or Call (954) 799-6359!

Why Is DIY Epoxy Resin So Popular?

Resinous coatings have gained a lot of popularity in recent years. Every month, every week, every day even, more and more contractors and DIY enthusiasts learn why. For some, it's because of its incredible longevity and strength. For others, it'll be its beauty, its variety in design possibilities, its gloss. No matter what you're looking for, epoxy resin can get it done.


Everything is built on a high quality DIY epoxy resin solution, like a blank canvas. And with a vinyl cove base system installed alongside, you'll be left with a truly complete flooring package. Do you want a set-it-and-forget-it solution? Our EasyCove products are perfect for you!

  • EasyCove is Clean - Resinous coatings, are designed to fight against dirt and grime. EasyCove is just another strong shield in your kit!
  • Concrete Repairs Done Right - Every concrete foundation for resinous coatings needs to be able to support them. With EpoxyETC, concrete repair has never been easier.
  • Professional-Grade DIY Resin - At EpoxyETC, we deliver resinous coating systems designed for the weekend warrior and contractor alike.
  • Better Solutions, Better Investment - As a DIY enthusiast or entrepeneur, you know how important budget is. EpoxyETC delivers cove base and resinous solutions at prices you want.
  • Complete Packages - Every high-and-low demand space, we serve them all. From the first step of installation, to the last cove base you put in, we'll be with you every step.
  • Waterproof Baseboard, Lifeproof Floors - Our vinyl base molding is specifically designed to help your floors stave off moisture, dirt and grime for years to come! Installing a waterproof baseboard is a great shield against the wear and tear of life.

How to Install EasyCove Base With DIY Epoxy Resin

Step 1: Concrete Repair

For precise concrete patch repair, the Manual Cartridge Gun is designed to efficiently dispense two-part epoxy adhesives and thicker patching compounds directly from dual-cartridges equipped with static mixers. To begin, simply load your cartridge, use the built-in puncture tool to open the seals, and attach the static mixer. The gun’s 26:1 thrust ratio and hardened steel dual gripping plates provide the high force needed to smoothly push out even cold, viscous materials, ensuring a consistent mix as the components pass through the mixer.

Apply the epoxy directly into the crack or spall, relying on the ergonomic, fatigue-free design for controlled application. The heavy-duty construction, including a steel trigger and adjustable push rod, ensures this tool delivers trouble-free, durable performance for a lasting repair that bonds securely to the concrete.

Explore Floor Care Products

Step 2: Epoxy Installation

To properly install an EasyCove system, you'll need to have your resinous coating system already in place. We have several guides on the installation of resins, whether it's polyaspartic or epoxy.

As always, you'll need to decide on a multitude of factors:

* Polyaspartic or epoxy system?
* How many layers?
* Broadcasts, traction additives, designs?
* What setting are you installing in?

Once you've installed your system and let it cure fully, you can move onto the EasyCove vinyl cove base installation.

Explore DIY Epoxy Resins

Step 3: Apply EasyCove Base Adhesive

For a secure bond, begin by loading the Easycove 1K Adhesive sausage into the dedicated Easycove Dispensing Gun. This professional-grade gun is built with heavy-duty metal components to smoothly dispense the adhesive, even in cooler conditions.

Apply three continuous beads of adhesive: two ¼-inch beads directly into the DoveLock™ interlocking bond channels on the back of the cove base, and a third bead at the 90° floor-wall junction where the cove anchor will sit.

The fast-setting formula has a 2-hour set time and provides high bond strength, with one 20oz sausage covering approximately 15 linear feet of cove.

Explore Concrete Removal Tools

Step 4: Install the EasyCove Base

Once the adhesive is applied, press the EasyCove Wall Epoxy Cove Base firmly into place, ensuring the adhesive fills the DoveLock™ channels for a watertight seal. For corners, use the pre-formed Easycove Corner Epoxy Cove Base, which features the same DoveLock™ engineering to simplify installation and reduce labor.

To maintain precise alignment while the adhesive sets, apply a fine line of the fast-setting EasyCove Joint Sealer along the cove’s top edge; this eliminates the need for taping or tack nailing.

Use the Flexible Cove Trowel to wipe down and smooth the cove’s surface, particularly on angles greater than 90°, and finish with the Epoxy Cove Trowel, made from tempered spring steel, to shape and refine the cove edge for a professional, seamless result. The system’s unique “no caulk” lip bevel removes the need for caulking, speeding up the overall installation.

Explore Cleaners & Degreasers

Where Epoxy Resin and Cove Bases Are Used

Whether you're looking to take advantage of the waterproof baseboard or just want the aesthetic elegance of vinyl cove base, you have options! We've seen our solutions work in a wide variety of settings, here's just a few:


DIY Epoxy Resin & EasyCove Base Uses

  • Animal Shelters
  • Commercial Kitchen
  • Pharmaceutical Industry
  • Pulp & Paper
  • Food & Beverage Industry
  • Healthcare
  • Laboratories
  • Commercial Areas
  • Light and Heavy Industry
  • Metal Industry
  • Warehouses
  • Wastewater Treatment
  • Light Manufacturing
  • Chemical Processing
  • Electronics

FAQ

What adhesive, and how much, should I use to install EasyCove?

Use Easycove 1K Adhesive,
a high‑strength, industrial‑grade formula specifically designed for
bonding EasyCove profiles to walls. Apply three beads: two ¼‑inch beads
into the DoveLock™ channels on the back of the cove and a third bead at
the floor‑wall junction.

What Are The Best Resinous Coatings for DIY Floors?

EpoxyETC delivers the best of a variety of resinous coating solutions to every weekend warrior and contractor! We recommend polyaspartic and epoxy resins by EpoxyETC or RockHard for the best results.

How do I keep the cove base aligned while the adhesive cures?

No taping or nailing is required. Apply Easycove Joint Sealer, a fast‑setting cyanoacrylate adhesive, along the top edge of the cove to hold it in perfect alignment while the 1K Adhesive sets. This eliminates the need for mechanical fasteners and speeds up installation.

How Do I Install DIY Resinous Coating Floors?

Every contractor and DIY enthusiast starts from somewhere. We highly recommend experimenting with smaller slabs to get the various techniques involved with epoxy resin installation, especially metallic epoxy powder pigments. Start small, practice your way up, and you'll join the pros in no time!

How Do I Become A DIY Epoxy Flooring Contractor?

Make the next step in your career with Epoxy Classes. Veteran installers will walk you through every step of the installation process, and teach you valuable business management and marketing skills. Invest in the right products, and invest in yourself!

How Do I Maintain Vinyl Cove Base?

Your resinous coating flooring systems will do most of the work in fighting off the wear and tear of life. But what about your vinyl base molding? It's simple! It's already designed to be a waterproof baseboard, so all you need to do is the same cleaning routine as your floors; warm water, gentle cleanser.